Using multiple nodes
When deploying multiple Socket.IO servers, there are two things to take care of:
- load balancing
- forwarding messages between the servers
Load balancing
If you plan to distribute the load of connections among different processes or machines, you have to make sure that all requests associated with a particular session ID reach the process that originated them.
There are several ways to achieve this:
In fact, Socket.IO could technically work without sticky sessions by synchronizing the session state between servers, as shown by the dashed lines below:
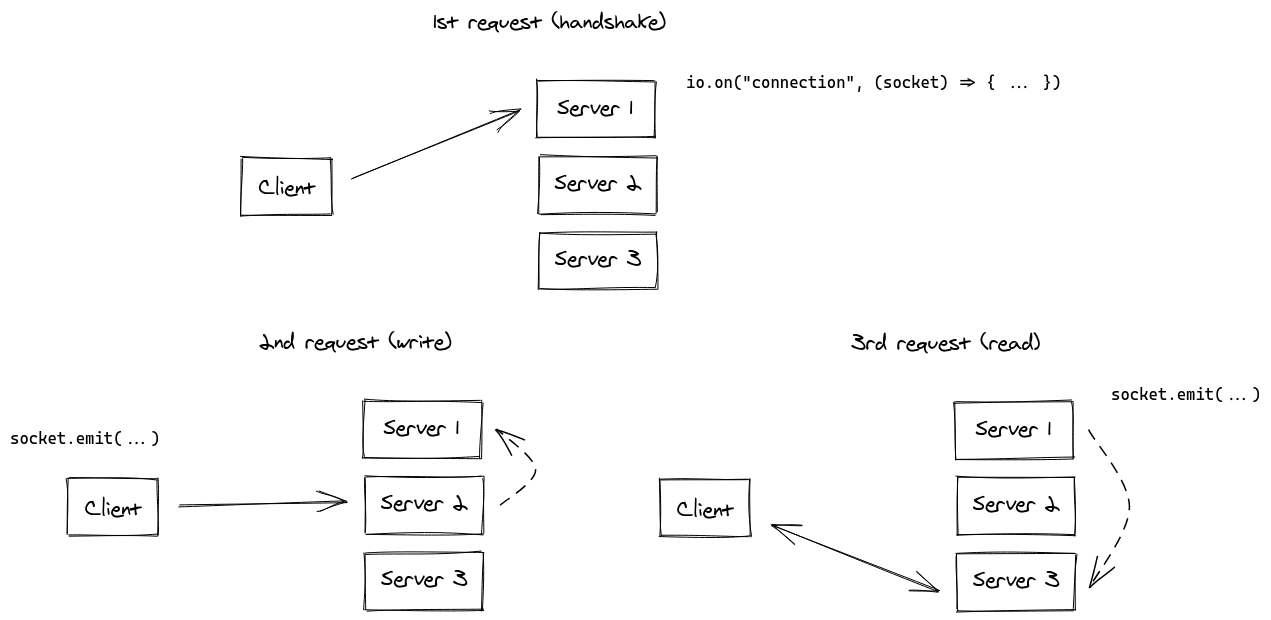
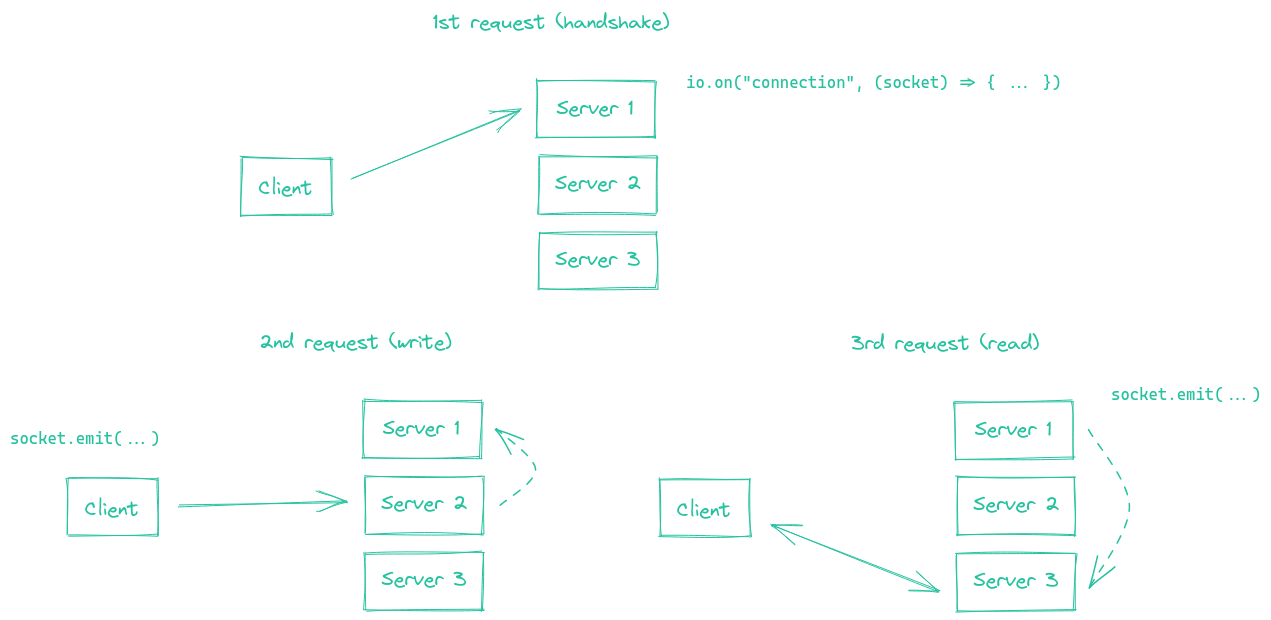
While obviously possible to implement, we think that this synchronization process between the Socket.IO servers would result in a big performance hit for your application.
Sticky sessions
Sticky sessions (also called session affinity) is a load balancing technique that ensures all HTTP requests from a particular client are always routed to the same server instance during the lifetime of a session.
In the context of Socket.IO, sticky sessions work as follows:
- When a client first connects, the load balancer assigns them to a specific Socket.IO server
- All subsequent requests from that client (including HTTP long-polling requests) are routed to the same server
- This ensures the server can maintain the client's session state and properly handle the bidirectional communication
The load balancer typically achieves this by either:
- Using a cookie that identifies which server the client should connect to
- Using the client's IP address to consistently route to the same server
- Using a session identifier in the URL or headers
You will find below some examples with common load-balancing solutions:
- nginx (IP-based)
- nginx Ingress (Kubernetes) (IP-based)
- Apache HTTPD (cookie-based)
- HAProxy (cookie-based)
- Traefik (cookie-based)
- Node.js
clustermodule
For other platforms, please refer to the relevant documentation:
- Kubernetes: https://kubernetes.github.io/ingress-nginx/examples/affinity/cookie/
- AWS (Application Load Balancers): https://docs.aws.amazon.com/elasticloadbalancing/latest/application/sticky-sessions.html
- GCP: https://cloud.google.com/load-balancing/docs/backend-service#session_affinity
- Heroku: https://devcenter.heroku.com/articles/session-affinity
nginx configuration
Within the http { } section of your nginx.conf file, you can declare a upstream section with a list of Socket.IO processes you want to balance the load between:
http {
  server {
    listen 3000;
    server_name io.yourhost.com;

    location / {
      proxy_set_header X-Forwarded-For $proxy_add_x_forwarded_for;
      proxy_set_header Host $host;

      proxy_pass http://nodes;

      # enable WebSockets
      proxy_http_version 1.1;
      proxy_set_header Upgrade $http_upgrade;
      proxy_set_header Connection "upgrade";
    }
  }

  upstream nodes {
    # enable sticky session with either "hash" (uses the complete IP address)
    hash $remote_addr consistent;
    # or "ip_hash" (uses the first three octets of the client IPv4 address, or the entire IPv6 address)
    # ip_hash;
    # or "sticky" (needs commercial subscription)
    # sticky cookie srv_id expires=1h domain=.example.com path=/;

    server app01:3000;
    server app02:3000;
    server app03:3000;
  }
}
Notice the hash instruction that indicates the connections will be sticky.
Make sure you also configure worker_processes in the topmost level to indicate how many workers nginx should use. You might also want to look into tweaking the worker_connections setting within the events { } block.
Links:
The value of nginx's proxy_read_timeout (60 seconds by default) must be bigger than Socket.IO's pingInterval + pingTimeout (45 seconds by default), else nginx will forcefully close the connection if no data is sent after the given delay and the client will get a "transport close" error.
nginx Ingress (Kubernetes)
Within the annotations section of your Ingress configuration, you can declare an upstream hashing based on the client's IP address, so that the Ingress controller always assigns the requests from a given IP address to the same pod:
apiVersion: networking.k8s.io/v1
kind: Ingress
metadata:
  name: your-ingress
  namespace: your-namespace
  annotations:
    nginx.ingress.kubernetes.io/configuration-snippet: |
      set $forwarded_client_ip "";
      if ($http_x_forwarded_for ~ "^([^,]+)") {
        set $forwarded_client_ip $1;
      }
      set $client_ip $remote_addr;
      if ($forwarded_client_ip != "") {
        set $client_ip $forwarded_client_ip;
      }
    nginx.ingress.kubernetes.io/upstream-hash-by: "$client_ip"
spec:
  ingressClassName: nginx
  rules:
    - host: io.yourhost.com
      http:
        paths:
          - path: /
            pathType: Prefix
            backend:
              service:
                name: your-service
                port:
                  number: 80
Notes:
nginx.ingress.kubernetes.io/upstream-hash-by: "$client_ip"
This annotation instructs the NGINX Ingress Controller to use the client's IP address for routing incoming traffic to a specific Pod in your Kubernetes cluster. This is crucial for maintaining sticky sessions.
nginx.ingress.kubernetes.io/configuration-snippet
This custom NGINX configuration snippet serves a dual purpose:
If the request passes through upstream reverse proxies or API gateways that append an
X-Forwarded-Forheader, this snippet extracts the first IP address from that header and uses it to update the $client_ip.In the absence of such proxies or gateways, the snippet simply uses the remote_addr, which is the IP address of the client directly connected to the ingress.
This ensures that the correct client IP is used for the sticky session logic, enabled by the nginx.ingress.kubernetes.io/upstream-hash-by: "$client_ip" annotation. The snippet is particularly important when your architecture includes upstream network components like reverse proxies or API gateways.
Links:
Apache HTTPD configuration
Header add Set-Cookie "SERVERID=sticky.%{BALANCER_WORKER_ROUTE}e; path=/" env=BALANCER_ROUTE_CHANGED

<Proxy "balancer://nodes_polling">
    BalancerMember "http://app01:3000" route=app01
    BalancerMember "http://app02:3000" route=app02
    BalancerMember "http://app03:3000" route=app03
    ProxySet stickysession=SERVERID
</Proxy>

<Proxy "balancer://nodes_ws">
    BalancerMember "ws://app01:3000" route=app01
    BalancerMember "ws://app02:3000" route=app02
    BalancerMember "ws://app03:3000" route=app03
    ProxySet stickysession=SERVERID
</Proxy>

RewriteEngine On
RewriteCond %{HTTP:Upgrade} =websocket [NC]
RewriteRule /(.*) balancer://nodes_ws/$1 [P,L]
RewriteCond %{HTTP:Upgrade} !=websocket [NC]
RewriteRule /(.*) balancer://nodes_polling/$1 [P,L]

# must be bigger than pingInterval (25s by default) + pingTimeout (20s by default)
ProxyTimeout 60
Links:
HAProxy configuration
# Reference: http://blog.haproxy.com/2012/11/07/websockets-load-balancing-with-haproxy/

listen chat
  bind *:80
  default_backend nodes

backend nodes
  option httpchk HEAD /health
  http-check expect status 200
  cookie io prefix indirect nocache # using the `io` cookie set upon handshake
  server app01 app01:3000 check cookie app01
  server app02 app02:3000 check cookie app02
  server app03 app03:3000 check cookie app03
Links:
Traefik
Using container labels:
# docker-compose.yml
services:
  traefik:
    image: traefik:2.4
    volumes:
      - /var/run/docker.sock:/var/run/docker.sock
    links:
      - server

  server:
    image: my-image:latest
    labels:
      - "traefik.http.routers.my-service.rule=PathPrefix(`/`)"
      - traefik.http.services.my-service.loadBalancer.sticky.cookie.name=server_id
      - traefik.http.services.my-service.loadBalancer.sticky.cookie.httpOnly=true
With the File provider:
## Dynamic configuration
http:
  services:
    my-service:
      rule: "PathPrefix(`/`)"
      loadBalancer:
        sticky:
          cookie:
            name: server_id
            httpOnly: true
Links:
Using Node.js Cluster
Just like nginx, Node.js comes with built-in clustering support through the cluster module.
There are several solutions, depending on your use case:
| NPM package | How it works |
|---|---|
@socket.io/sticky | the routing is based on the sid query parameter |
sticky-session | the routing is based on connection.remoteAddress |
socketio-sticky-session | the routing based on the x-forwarded-for header) |
Example with @socket.io/sticky:
const cluster = require("cluster");
const http = require("http");
const { Server } = require("socket.io");
const numCPUs = require("os").cpus().length;
const { setupMaster, setupWorker } = require("@socket.io/sticky");
const { createAdapter, setupPrimary } = require("@socket.io/cluster-adapter");

if (cluster.isMaster) {
  console.log(`Master ${process.pid} is running`);

  const httpServer = http.createServer();

  // setup sticky sessions
  setupMaster(httpServer, {
    loadBalancingMethod: "least-connection",
  });

  // setup connections between the workers
  setupPrimary();

  // needed for packets containing buffers (you can ignore it if you only send plaintext objects)
  // Node.js < 16.0.0
  cluster.setupMaster({
    serialization: "advanced",
  });
  // Node.js > 16.0.0
  // cluster.setupPrimary({
  //   serialization: "advanced",
  // });

  httpServer.listen(3000);

  for (let i = 0; i < numCPUs; i++) {
    cluster.fork();
  }

  cluster.on("exit", (worker) => {
    console.log(`Worker ${worker.process.pid} died`);
    cluster.fork();
  });
} else {
  console.log(`Worker ${process.pid} started`);

  const httpServer = http.createServer();
  const io = new Server(httpServer);

  // use the cluster adapter
  io.adapter(createAdapter());

  // setup connection with the primary process
  setupWorker(io);

  io.on("connection", (socket) => {
    /* ... */
  });
}
Disabling HTTP long-polling
When you configure the Socket.IO client to not use HTTP long-polling (using only WebSocket or WebTransport), sticky sessions are no longer required. This is because:
Single persistent connection: WebSocket establishes a single, long-lived TCP connection between the client and server, unlike HTTP long-polling which sends multiple HTTP requests throughout the session.
No session routing issues: Since all communication happens over one TCP connection, there's no risk of subsequent requests being routed to different servers. The client maintains its connection to the same server for the entire session duration.
Simplified infrastructure: You can use simple round-robin load balancing without the need for sticky session configuration, reducing complexity in your load balancer setup.
Example (client):
const socket = io({
  transports: ["websocket"]
  // or with WebTransport too (Socket.IO v4.6.0+)
  // transports: ["websocket", "webtransport"]
});
Pros
No sticky sessions required
With WebSocket or WebTransport only, the client uses a single persistent connection. Since there are no repeated HTTP polling requests, you avoid the risk of different requests being routed to different servers.
Better performance
WebSocket and WebTransport avoid the overhead of repeated HTTP requests and headers for every polling cycle.
Lower latency
Messages can be sent immediately over the persistent connection instead of waiting for polling request cycles.
Cons
Reduced compatibility
HTTP long-polling is the most widely compatible fallback. Disabling it means clients in restrictive networks may fail to connect.
Client-side load balancing
Client-side load balancing is an approach where the client application itself decides which server to connect to, rather than relying on a load balancer. This eliminates the need for sticky sessions since each client maintains a persistent connection to a single server of its choice.
In this approach:
- The client is provided with a list of available Socket.IO server URLs
- The client selects one server from the list (randomly, round-robin, or based on custom logic)
- The client establishes a connection directly to the chosen server
- All subsequent communication happens with that same server
Example (client):
const SERVERS = [
    "https://s1.example.com",
    "https://s2.example.com",
    "https://s3.example.com",
];

function pickServer() {
    return SERVERS[Math.floor(Math.random() * SERVERS.length)];
}

const socket = io(pickServer());

socket.io.on("reconnect_attempt", () => {
    socket.io.uri = pickServer();
});
Pros
No sticky sessions required
Each client connects directly to one selected server and keeps using that connection, so you avoid configuring session affinity at the proxy/load-balancer level.
Direct control over routing logic
The client can choose a server randomly, by region, by latency, by priority, or using custom business rules.
Cons
Harder to update server topology
Adding, removing, or draining servers requires a way to update the client-side server list, often through configuration or a discovery endpoint.
Uneven load distribution
Random selection can lead to imbalance, especially with a small number of clients or clients with very different traffic volumes.
Forwarding messages between the servers
Now that you have multiple Socket.IO servers accepting connections, if you want to broadcast events to all clients (or to the clients in a certain room) you’ll need some way of passing messages between processes or computers.
The interface in charge of routing messages is what we call the Adapter.
There are several options available: